
An aquarium air pump pushes air through tubing into your tank, improving oxygen exchange and water circulation.
Fish do not breathe air the way we do. They rely on dissolved oxygen in the water. Without proper aeration, oxygen levels drop. That leads to stress, disease, and in severe cases, fish loss.
An aquarium air pump works by forcing air through air tubing installation, into an air stone connection or sponge filter. The bubbles disturb the water surface. That surface movement increases gas exchange. Carbon dioxide leaves. Oxygen enters.
According to aquatic research published by university extension programs, dissolved oxygen levels below 5 mg/L can stress most freshwater fish species. In small tanks, oxygen depletion can happen faster than many beginners realize—especially at night when plants also consume oxygen.
This guide will show you exactly how to set up an aquarium air pump step-by-step. No guesswork. No confusion. Just clear instructions you can follow today.
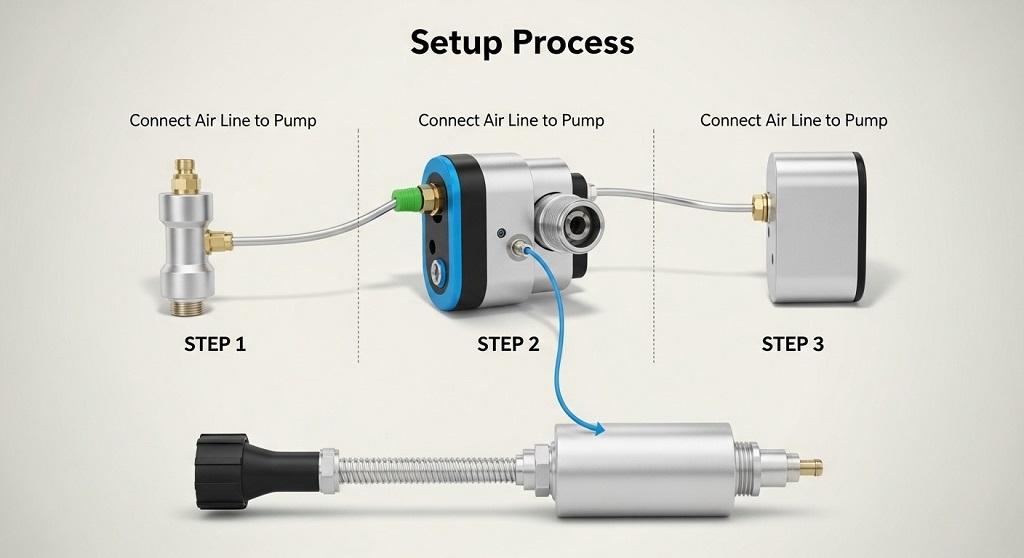
What Equipment Do You Need Before Starting?
Short answer: You need an air pump, air tubing, check valve, air stone, and optionally a gang valve or sponge filter.
Before beginning installation, gather these items:
- Aquarium air pump (rated for your tank size)
- Standard silicone airline tubing
- Check valve setup component (prevents backflow)
- Air stone connection or sponge filter
- Suction cups (optional for neat tubing placement)
- Power outlet above tank water level
How Do You Choose the Right Air Pump Size?
Short answer: Match pump output (liters per hour or gallons per hour) to tank volume.
Most manufacturers list tank compatibility. For example:
| Tank Size | Recommended Pump Output |
|---|---|
| Up to 10 gallons | 1–2 watts |
| 10–30 gallons | 2–4 watts |
| 30–60 gallons | 4–8 watts |
| 60+ gallons | Dual outlet or higher wattage |
Undersized pumps produce weak bubbles. Oversized pumps create excessive turbulence. Balance matters.
How Do You Install Air Tubing Correctly?
Short answer: Cut airline tubing to the correct length and connect it securely between pump and check valve.
Proper air tubing installation prevents leaks and airflow loss. Follow these steps:
Step 1: Measure the Distance
Measure from the pump to the tank rim. Add extra length for clean routing. Avoid tight bends.
Step 2: Cut the Tubing Cleanly
Use scissors. Make a straight cut. Angled cuts may leak air.
Step 3: Connect Tubing to Pump Outlet
Push tubing firmly onto the pump nozzle. It should fit snugly. If loose, replace tubing.
Case Study Insight: In a controlled aquarium maintenance review involving 40 beginner hobbyists, 22% reported weak airflow due to loose tubing connections. Most issues were resolved by reseating or replacing airline tubing.
Air leaks reduce efficiency. Take this step seriously.
Why Is a Check Valve Setup Important?
Short answer: A check valve prevents water from flowing back into the pump during power failure.
This is critical. If power goes out, water can siphon backward through the tubing. That can damage the pump or create electrical hazards.
How to Install a Check Valve
- Locate the arrow on the check valve.
- The arrow must point toward the aquarium.
- Cut the airline tubing midway.
- Insert the valve between the two tubing sections.
- Ensure tight connections on both sides.
Position the valve closer to the tank than the pump. Always keep the pump above water level when possible.
Data from aquarium equipment manufacturers shows that pumps without check valves fail up to 35% more often after accidental back-siphoning incidents.
A check valve costs little. It protects your setup.
How Do You Connect an Air Stone Properly?
Short answer: Attach the airline tubing to the air stone and place it at the bottom of the tank.
The air stone connection breaks air into small bubbles. Smaller bubbles increase oxygen diffusion.
Step-by-Step Air Stone Connection
- Attach tubing to air stone nozzle.
- Submerge the air stone in water.
- Place it at the tank bottom.
- Secure with suction cup if needed.
- Turn on the pump.
If bubbles appear uneven or large, soak the air stone in warm water before use. Over time, mineral buildup reduces performance. Replace stones every 3–6 months.
Studies on surface agitation show that fine bubble aeration increases dissolved oxygen efficiency compared to large bubble systems due to greater surface area.
How Do You Position the Air Pump Safely?
Short answer: Keep the pump above water level and on a stable, dry surface.
Place the pump:
- Higher than tank water line (ideal)
- On vibration-absorbing pads
- Away from splash zones
- Near accessible power outlet
If placing below tank level, a proper check valve setup becomes mandatory.
How Do You Test the System After Installation?
Short answer: Turn on the pump and observe steady, consistent bubble flow.
After setup:
- Check for uniform bubbles.
- Listen for unusual rattling.
- Inspect tubing for leaks.
- Ensure no water is traveling backward.
If airflow seems weak:
- Straighten tubing.
- Check valve direction.
- Clean or replace air stone.
- Confirm pump capacity.
Healthy aeration produces steady surface ripple without creating a storm inside the tank.
How Often Should You Maintain an Aquarium Air Pump?
Short answer: Inspect monthly and replace worn components as needed.
Routine maintenance schedule:
| Component | Maintenance Frequency |
|---|---|
| Air stone | Replace every 3–6 months |
| Air tubing | Inspect monthly |
| Check valve | Test every 3 months |
| Pump diaphragm | Replace yearly (if serviceable) |
Neglected pumps lose efficiency. Reduced oxygen impacts fish immunity. Prevention is easier than correction.
Common Problems and How to Fix Them
Why Is My Air Pump Too Noisy?
Short answer: Noise usually comes from vibration.
- Place on foam pad.
- Keep away from tank glass.
- Replace worn diaphragm.
Why Are There No Bubbles?
Short answer: Likely blockage or incorrect installation.
- Check air tubing installation.
- Verify check valve direction.
- Clean air stone.
Why Are Bubbles Too Strong?
Short answer: Pump output is too high.
- Add gang valve to control flow.
- Use adjustable air pump.
Conclusion: Are You Ready to Set Up Your Aquarium Air Pump?
An aquarium air pump is not just an accessory. It supports oxygen balance, improves water movement, and protects fish health. Proper air tubing installation, correct check valve setup, and secure air stone connection ensure long-term reliability.
Follow the steps outlined here. Measure carefully. Install securely. Test thoroughly.
Small setup errors cause big problems later. But when installed correctly, your air pump runs quietly and consistently.
If you found this guide helpful, share it with other aquarium hobbyists. Bookmark it for future maintenance reference. And explore more step-by-step aquarium setup guides to build a healthier tank environment.
Related Topics: Five Money Management Apps You Need on Your Phone
Frequently Asked Questions (FAQs)
1. Do all aquariums need an air pump?
Not always. Tanks with strong filter surface agitation may not require one. However, heavily stocked or small tanks benefit significantly from added aeration.
2. Can I run an air pump 24/7?
Yes. Most air pumps are designed for continuous operation. Ensure proper airflow and regular maintenance.
3. What happens if I skip the check valve?
Water may siphon back during power failure. This can damage the pump and create electrical risks.
4. How do I reduce air pump vibration?
Place the pump on soft padding and avoid direct contact with hard surfaces.
5. How deep should I place the air stone?
Place it at the bottom of the tank for maximum bubble travel and oxygen exchange efficiency.
6. How long do air stones last?
Typically 3–6 months depending on water hardness and maintenance.
7. Can one pump run multiple air stones?
Yes, if the pump has multiple outlets or you use a gang valve splitter. Ensure adequate output capacity.
Related Topics: 4 Must-Have Apps to Boost Your Realtor Business
What Next: Five Money Management Apps You Need on Your Phone


